Tuesday, March 5, 2013

DIY "Helping Hands" Dish Towel - (No Sewing Required!)

I got inspired from a project I saw that used kids' hand prints to make a cute kitchen towel:
Hand print Towel

So, I decided to put a new spin on mine (that also didn't require sewing - as I don't have a machine yet) and make personalized gifts for all of my kids' grandparents and great-grandparents this past year for Christmas, and, of course, one for our own kitchen as well.

Here's what you'll need:

1. Dish towel(s)
2. Heat n' Bond Iron-on Adhesive
3. Iron-on transfer ink-jet paper
4. Fabric
5. One sheet of card stock paper

Step 1: Hand Prints

Trace your child's (children's) hand on the piece of card stock paper and cut out.  Use this as a template to trace on to the heat n' bond adhesive.  That way, you don't have to keep tracing your child (children's) hands over and over directly on to the iron-on adhesive if you want to make more than one towel at a time.  Once you trace them all out on the heat n' bond adhesive, iron on your hand print(s) on to the back side of your fabric.  After it cools, cut out the hand print and peel the back of the paper off.

Step 2: Words for your Towel


Play with fonts on your computer and print out several practice pages to see if it's going to be too big or too small for the area of the towel that you want displayed.  I had in mind that I wanted my towels to be folded in thirds, so I only wanted the words to be in the middle third of the towel.

Also, I printed much smaller words for the back inside of my towel.


Then, print your final copies on the Iron-on transfer ink-jet paper.  By the way, it took me a while to discover that all I needed to do to get my own printer to print backwards (since it's an iron-on) was to select "Iron On Transfer" on my printer settings.  Some printers want you to flip the image - so just make sure you check on that before wasting a piece of iron-on paper.

Step 3: Iron your masterpiece together!


Check the iron settings on the instructions for the heat n' bond and the iron-on ink-jet paper - they will be different and you don't want to mess it up after all that hard work you just did.

Also, make sure you are ironing on a flat hard surface (not an ironing board) - I used a few flat towels laid out on top of my kitchen table, however I went off the towel and burned the table cloth a bit - don't let this happen to you!


Step 4: Admire your masterpiece(s)!


Step 5: Prepare as a gift - and include optional glass bead magnets in an organza bag - use same instructions, but use your child's picture printed on photo paper like I did!


P.S. We have washed ours in the washing machine and dried in the dryer with no problems so far.

Monday, February 11, 2013

Canvas + Glue + Paint = Art!

I found this idea, like most of my crafts, on Pinterest.  Here's the original link.

Now, I did this project without actually reading the instructions, just going by the caption and the picture on Pinterest, and I think it actually turned out pretty well.  She actually says not to use glue, but she also does the craft in a slightly different, and seemingly more complicated, way.

I used a pencil and drew a picture on a canvas, using a drawing I found online. Then, I outlined it with white glue and let it dry.  Finally, I used a sponge brush and some acrylic paint and gave the whole thing a couple layers of color.  And, voila!  Art for my daughter's Hawaiian-themed room!


Wednesday, December 12, 2012

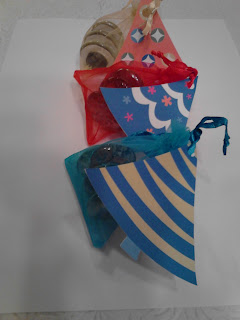
Glass Bead Magnets + Organza Bag = cute & cheap gift!

I made a bunch of sets of glass bead magnets for my kids' teachers for Christmas this year and put three in a little organza bag, cut out a cute holiday design on card stock for the tag, and voila!  Super cute and super cheap holiday gift and all the teachers loved them!

Here's my original post on the magnets. Though, after making many of these, I highly recommend the stronger magnets.  As my further "scientific" testing has proven that they definitely work better to hold themselves and other items to the fridge.

You can Google holiday clip art to find a shape to print out on card stock for the tag if you're not one for drawing one yourself.

Also, I bought 100 organza bags for cheap on Amazon, like $8 or so.


Tuesday, December 11, 2012

Chalk Board Message Magnets

I thought up this idea by combining several crafts I saw on Pinterest, and after several trial and error attempts, I came up with a design that I was pretty proud of.  My fabulous and super-supportive cousin-in-law even ordered 30 of them from me for her work's holiday party.  She used them for place markers at the luncheon and wrote everyone's name on them.

For one message magnet, you need the following:

- Piece of chalk
- Clothes pin
- Magnet for back of clothes pin
- Gorilla glue or super glue to adhere magnet to clothes pin
- Small piece of scrapbook paper to decorate the clothes pin
- Mod Podge to adhere paper to clothes pin
- Canning lid - I use the larger size
- Magnet for back of canning lid
- Chalkboard contact paper cut in a circle for front of canning lid
- Piece of ribbon tied in a bow to decorate lid
- Hot glue to adhere ribbon to lid
- Decorated Bottle cap - you can do this in a variety of ways - see my post on bottle caps.
- Magnet for back of bottle cap

Step 1: Clothes pin

Take a clothes pin and cut a piece of scrapbook paper the size of the clothes pin.  Use Mod Podge to adhere paper to clothes pin and then also put a layer on top of paper to seal it in.  Let dry. Gorilla glue or super glue magnet to back of clothes pin.  Once it's all dry, clip your chalk in the clothes pin.

Step 2: Canning lid

Cut out a circular size of chalkboard contact paper and adhere to middle of canning lid.  Adhere magnet to back of lid using gorilla glue. Let dry overnight. Use a drop of hot glue to place ribbon on the top front of lid.

Step 3: Bottle Cap Magnet

You can make this in a variety of ways.  Use Mod Podge to glue a piece of scrapbook paper in the center and let dry. Then, top with a resin dot or with Mod Podge Dimensional Magic (my new favorite crafting supply). Once that's dry, use gorilla glue to adhere magnet to back.  Even if you buy the self stick magnets, you will still want to glue it on.  They don't always hold for very long.  Let the glue dry overnight.

Step 4: Put it all together!


Here's what 30 of them look like (these are the ones for my cousin-in-law's co-workers - they're teachers, hence the apple theme):


Wednesday, July 25, 2012

DIY Bean Bag Toss (Cornhole) Game - using a Diaper Box

I took on my first sewing project the other week and made some little 4" bean bags (DIY Mini Bean Bags) for the kids to play with, then my husband said we needed a bean bag toss game to go with it.  So, I grabbed a baby diaper box and decided to make my own.  It only requires a box, scissors or box cutter, and a measuring tape or ruler.

First, I turned the box right side up and cut off the four flaps.

Then, I turned it upside down and cut the holes where I wanted.  I used an exacto knife and a circle cutter to make my circle, but you could easily trace something like a round lid, to get a round shape.  

Next, I measured down the back side of the box (the side closest to the holes that I cut)
 and made marks on each edge 8" down and down the front side of the box I made marks on each edge at 4" down, then connected the dots and cut off that part of the box to get an angled shape.  

Voila!  A bean bag toss game! 

In case you were wondering, the rules I saw on bagtoss.com said that the slit hole is worth 5 points, the round hole is worth 3 points and landing on the surface is worth 1 point.

Tuesday, June 26, 2012

DIY Counting Bean Bags


DIY Counting Bean Bags

After I made the DIY Mini Bean Bags, I decided I'd try out the Counting Bean Bags tutorial. If you didn't read the Mini Bean Bags blog, I used these two websites to teach myself to sew: How to Sew and Blanket Stitch Tutorial Video since these were my first go-rounds with sewing.

Materials needed:

- squares of fabric - two per bean bag (use the 4 1/2" square template in the Counting Bean Bags tutorial for ease)
- fabric to cut out numbers from
- iron-on adhesive to apply numbers to bean bag (she uses cotton muslin & adhesive backed light fusible web instead, but I did it the easy way)
- needle and thread
- scissors
- beans (I used pinto beans because they were the cheapest medium sized beans I could find)

Instructions:

1. Prepare your numbers to be ironed on by printing the stencils on card stock and tracing them backwards on the iron-on adhesive.  Then, follow the iron-on adhesive instructions to adhere the number to the back side of the fabric and cut out the number.  You can now place the number on your square of fabric and iron it in place.  Do this for each of your counting bean bags, then follow the rest of the instructions which are the same as the Mini Bean Bag instructions.

*I actually used my Mother-in-law's sewing machine for the counting bean bags (and got one of my first sewing machine lessons in the process), but if you don't have access to one, then follow these steps, as I did for my first set of bean bags.
2. Take two squares of fabric and place them with the front sides touching and the back sides facing out.  Pin the pieces together around the perimeter.
This shows a complete bean bag and one that is pinned.

3. Thread your needle (use "How to Sew" link to see different choices - I like double thread) - and secure one end with a knot.

4. Sew around 3 1/2 sides with a back stitch (on "How to Sew" link) leaving a hole to fill with beans.  If you want your bean bags uniform, make sure to leave the hole in the same place on each bean bag.  I left a hole in the bottom center of mine under the numbers.
Front side of "back stitch"

  
Back side of "back stitch"
5. Turn material right side out and fill with beans.

6. Sew around entire bean bag again with a whip stitch or a blanket stitch (watch Blanket Stitch Tutorial Video).


7. You now have a set of counting bean bags!


Sunday, June 24, 2012

DIY Mini Bean Bags

I decided to teach myself to hand sew on Friday (my first time ever to sew) and the first project I wanted to make was a set of mini bean bags for the kids to play with.  I got the bean bag idea from this website (it was Gift #21): 100 Days of Homemade Christmas Gifts .  Here's the direct link: Making Bean Bags .  I also used this bean bag tutorial because she had templates to trace and cut out the fabric with: Counting Bean Bags . I used these two websites to teach myself to sew How to Sew and Blanket Stitch Tutorial Video because, this being my first attempt at it, I obviously don't own a sewing machine.


Materials needed:

- squares of fabric - two per bean bag (use the 4 1/2" square template in the Counting Bean Bags tutorial for ease)
- needle and thread
- scissors
- beans (I used pinto beans because they were the cheapest medium sized beans I could find)

Instructions:

1. Take two squares of fabric and place them with the front sides touching and the back sides facing out.  Pin the pieces together around the perimeter.
This shows a complete bean bag and one that is pinned.

2. Thread your needle (use "How to Sew" link to see different choices - I like double thread) - and secure one end with a knot.

3. Sew around 3 1/2 sides with a back stitch (on "How to Sew" link) leaving a hole to fill with beans.
Front side of "back stitch"

  
Back side of "back stitch"
4. Turn material inside out and fill with beans.

5. Sew around entire bean bag again with a whip stitch or a blanket stitch (watch Blanket Stitch Tutorial Video).


6. You now have a cute mini bean bag!  Yeah!